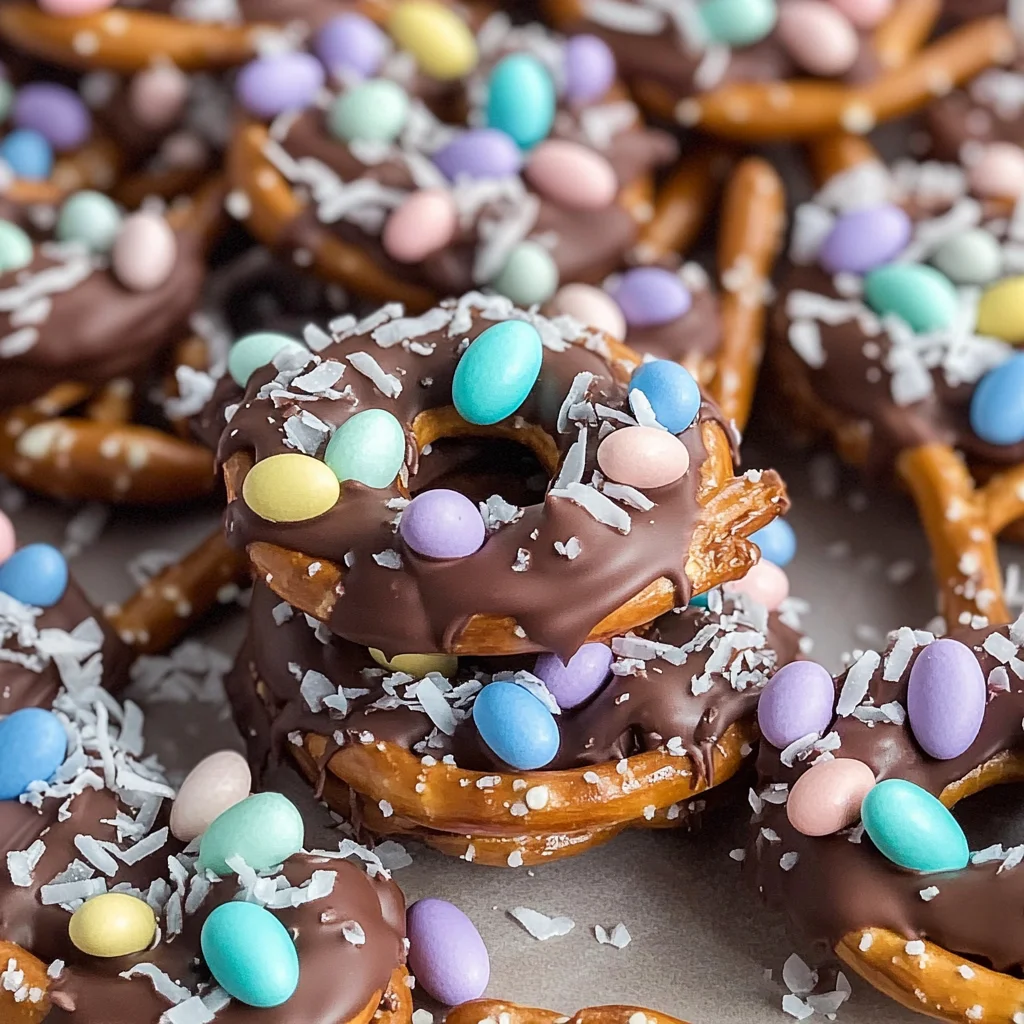
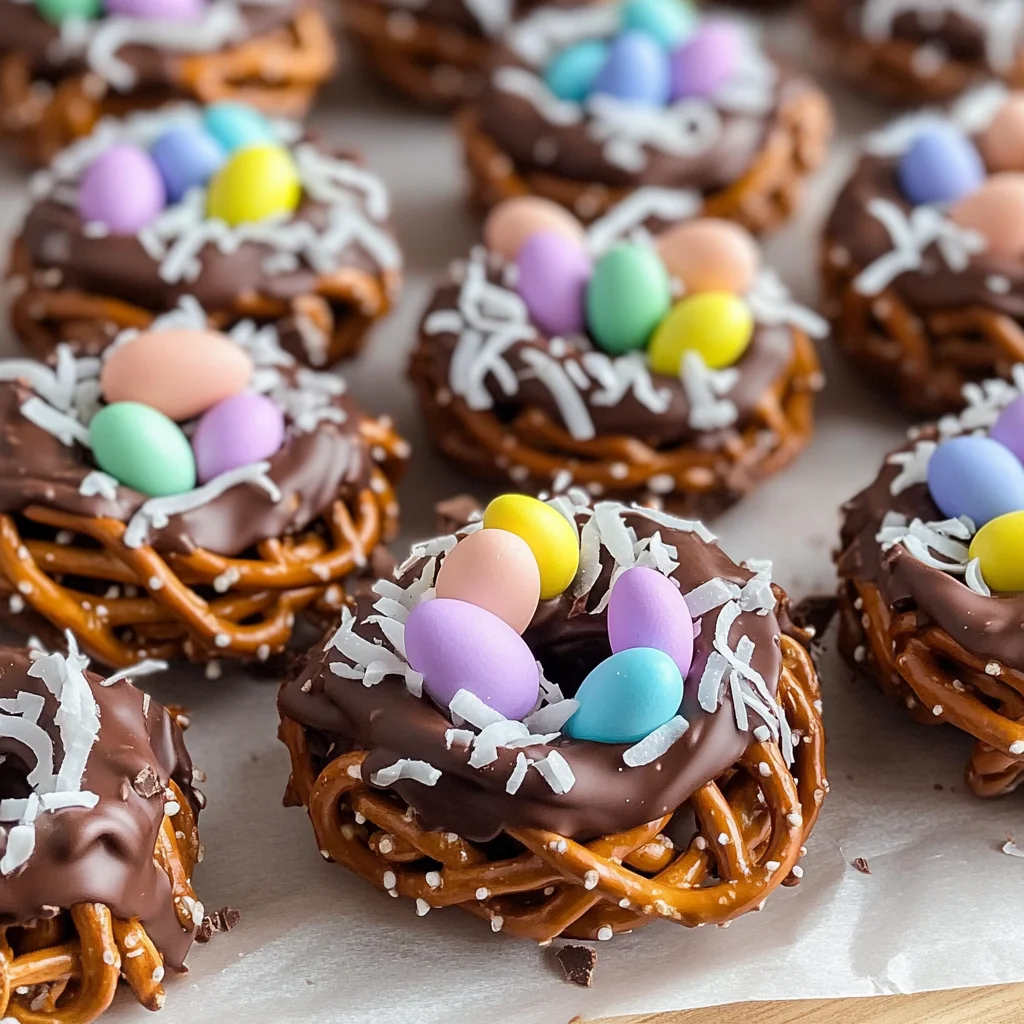
Chocolate-Covered Pretzel Nests
Chocolate-Covered Pretzel Nests are a delightful treat that combines sweet and salty flavors in a fun, festive way. These charming nests are perfect for Easter celebrations, spring gatherings, or any occasion where you want to bring smiles to faces. With their crunchy texture and appealing look, they’re not just tasty but also a wonderful project to make with kids.
Why You’ll Love This Recipe
- Easy to Make: With just a few simple steps, anyone can whip up these delicious treats.
- Versatile: You can customize them with your favorite chocolate and toppings for endless variations.
- Perfect for Celebrations: These nests are a great addition to Easter baskets or dessert tables.
- Fun Activity for Kids: Making Chocolate-Covered Pretzel Nests is a fun and engaging activity for children.
- Delicious Flavor Combination: The mix of sweet chocolate and salty pretzels creates an irresistible snack.
Tools and Preparation
Before you start making your Chocolate-Covered Pretzel Nests, gather your tools. Having everything ready will make the process smoother and more enjoyable.
Essential Tools and Equipment
- Microwave-safe bowl
- Baking sheet
- Parchment paper
- Mixing spoon
Importance of Each Tool
- Microwave-safe bowl: Ideal for melting chocolate quickly without burning it.
- Baking sheet: Provides a sturdy surface for shaping the nests.
- Parchment paper: Prevents sticking, making it easy to remove the nests once set.
- Mixing spoon: Helps coat the pretzels evenly in melted chocolate.
Ingredients
To create these delightful Chocolate-Covered Pretzel Nests, you’ll need the following ingredients:
For the Nests
- 4 cups pretzel sticks
- 1 ½ cups milk chocolate chips (or dark/white chocolate)
- 1 cup mini candy eggs (such as Cadbury eggs or jellybeans)
- ½ cup shredded coconut (optional, for a nest effect)
- Sprinkles (optional, for decoration)
How to Make Chocolate-Covered Pretzel Nests
Step 1: Melt the Chocolate
In a microwave-safe bowl, heat the chocolate chips in 20-second intervals. Stir between each interval until fully melted.
Step 2: Coat the Pretzels
Add the pretzel sticks to the melted chocolate. Toss them gently to ensure they are evenly coated.
Step 3: Form the Nests
On a lined baking sheet, take small handfuls of coated pretzels. Shape them into nest-like circles by arranging them closely together.
Step 4: Add Eggs and Toppings
Place mini candy eggs in the center of each nest. If desired, sprinkle with shredded coconut or sprinkles for added decoration.
Step 5: Chill and Set
Refrigerate the nests for about 20-30 minutes until the chocolate hardens. Once set, serve and enjoy your delightful Chocolate-Covered Pretzel Nests!
How to Serve Chocolate-Covered Pretzel Nests
Chocolate-Covered Pretzel Nests are delightful treats that can be served in various fun ways. Whether for a festive gathering or a casual snack, these nests will surely impress your guests. Here are some creative serving suggestions.
At a Spring Celebration
- Arrange the nests on a colorful platter to highlight their cheerful appearance. This makes them an eye-catching centerpiece for any spring celebration.
As Party Favors
- Package individual nests in clear cellophane bags tied with ribbon. These make sweet, edible gifts for guests to take home.
On a Dessert Table
- Incorporate the nests into a larger dessert spread featuring other treats. They pair beautifully with cupcakes, cookies, and other Easter-themed goodies.
For Kids’ Snack Time
- Serve the nests as an after-school treat. Kids will love the combination of chocolate and candy, making it a fun and satisfying snack.
With Seasonal Fruit
- Pair the nests with fresh fruit like strawberries or grapes. The fruity freshness complements the sweetness of the chocolate-covered pretzels.
How to Perfect Chocolate-Covered Pretzel Nests
To ensure your Chocolate-Covered Pretzel Nests turn out beautifully every time, follow these helpful tips.
- Use quality chocolate: Opt for high-quality chocolate chips for a smoother melt and richer flavor.
- Cool pretzels before coating: Let the pretzels cool slightly before dipping them in chocolate to prevent melting.
- Mix textures: Consider adding nuts or seeds along with coconut for added crunch and flavor variety.
- Experiment with flavors: Try different chocolate types (dark, white) or add flavor extracts (like vanilla) to the melted chocolate.
- Customize decorations: Get creative with toppings by using colorful sprinkles or edible glitter to make your nests stand out.
- Store properly: Keep the finished nests in an airtight container at room temperature to maintain freshness.
Best Side Dishes for Chocolate-Covered Pretzel Nests
Pairing side dishes with your Chocolate-Covered Pretzel Nests can enhance your snack table. Here are some great options that complement their sweet and salty flavors.
-
Fruit Salad
A refreshing mix of seasonal fruits can balance out the richness of the nests. Consider using berries, melons, and citrus for color and taste. -
Veggie Platter
Fresh vegetables like carrots, cucumber, and bell peppers provide a crunchy contrast to the sweetness of the nests. Serve with hummus or dip. -
Cheese Board
A selection of cheeses can offer savory notes that pair well with chocolate treats. Include crackers for added texture. -
Mini Sandwiches
Create small sandwiches using turkey or chicken slices on whole-grain bread. They make a satisfying addition alongside sweet snacks. -
Popcorn Mix
A sweet-and-salty popcorn mix can be a fun finger food option alongside your pretzel nests. Add nuts or chocolate drizzles for extra flair. -
Chocolate Dipped Fruit
To keep things thematic, serve fruit like strawberries or bananas dipped in chocolate as another sweet treat option that pairs well with the nests.
Common Mistakes to Avoid
Making Chocolate-Covered Pretzel Nests can be fun, but there are some common pitfalls to watch out for.
- Using the wrong chocolate: Not all chocolates melt well. Choose high-quality chocolate chips specifically designed for melting to ensure a smooth coating.
- Overheating the chocolate: Heating chocolate too long can cause it to seize. Melt it in short bursts, stirring frequently.
- Not shaping the nests properly: If you don’t form the nests tightly, they may fall apart. Use small handfuls of coated pretzels and press them together firmly.
- Skipping the chilling step: Refrigerating your nests is crucial to set the chocolate. Don’t skip this step or your treats won’t hold their shape.
- Neglecting decoration options: Adding toppings like coconut or sprinkles enhances the visual appeal. Don’t forget to add these fun elements!
Storage & Reheating Instructions
Refrigerator Storage
- Store Chocolate-Covered Pretzel Nests in an airtight container.
- They can last up to 1 week in the fridge.
Freezing Chocolate-Covered Pretzel Nests
- Wrap each nest in plastic wrap and place them in a freezer-safe bag.
- They can be frozen for up to 3 months.
Reheating Chocolate-Covered Pretzel Nests
- Oven: Preheat your oven to 200°F (93°C) and warm the nests on a baking sheet for about 5-10 minutes.
- Microwave: Place one nest on a microwave-safe plate and heat for 10-15 seconds at a time until just warmed through.
- Stovetop: Use a double boiler on low heat; add the nests carefully and warm gently while stirring occasionally.
Frequently Asked Questions
If you’re curious about making Chocolate-Covered Pretzel Nests, here are some common questions.
How do I make Chocolate-Covered Pretzel Nests?
To make Chocolate-Covered Pretzel Nests, melt chocolate, coat pretzels, form nests on a baking sheet, add mini candy eggs, chill to set, and enjoy!
Can I customize my Chocolate-Covered Pretzel Nests?
Absolutely! You can try different types of chocolate or add various toppings such as nuts or dried fruits for added flavor and texture.
How long do Chocolate-Covered Pretzel Nests last?
When stored properly in an airtight container in the refrigerator, they can last up to a week. They also freeze well for up to three months.
Can I use different types of pretzels?
Yes! You can use any pretzel shape you prefer. Stick pretzels work best for nest shapes, but you can experiment with twists or mini pretzels as well.
Final Thoughts
Chocolate-Covered Pretzel Nests are not only delightful but also versatile treats that everyone will love. Their sweet and salty combination makes them perfect for any occasion. Feel free to customize them with your favorite candies or toppings to make them uniquely yours!
Chocolate-Covered Pretzel Nests

Chocolate-Covered Pretzel Nests are a delightful combination of sweet and salty flavors, perfect for any festive occasion. With a crunchy texture and an irresistible chocolate coating, these treats are not only fun to make but also a great way to engage kids in the kitchen. Whether you’re celebrating springtime or simply looking for a unique dessert idea, these colorful candy nests will bring smiles to faces of all ages. Easy to customize with your favorite toppings, they serve as an eye-catching centerpiece on any dessert table or as party favors.
- Prep Time: 15 minutes
- Cook Time: 10 minutes
- Total Time: 25 minutes
- Yield: Approximately 12 nests 1x
- Category: Dessert
- Method: No-bake
- Cuisine: American
Ingredients
- 4 cups pretzel sticks
- 1 ½ cups milk chocolate chips (or dark/white chocolate)
- 1 cup mini candy eggs (such as jellybeans)
- ½ cup shredded coconut (optional)
- Sprinkles (optional)
Instructions
- Melt the chocolate chips in a microwave-safe bowl in 20-second intervals, stirring until smooth.
- Coat the pretzel sticks in the melted chocolate, ensuring they are evenly covered.
- On a lined baking sheet, shape small handfuls of coated pretzels into nest-like circles.
- Place mini candy eggs in the center of each nest and add shredded coconut or sprinkles if desired.
- Chill in the refrigerator for 20-30 minutes until set.
Nutrition
- Serving Size: 1 serving
- Calories: 130
- Sugar: 10g
- Sodium: 100mg
- Fat: 7g
- Saturated Fat: 4g
- Unsaturated Fat: 3g
- Trans Fat: 0g
- Carbohydrates: 15g
- Fiber: 1g
- Protein: 1g
- Cholesterol: 0mg